
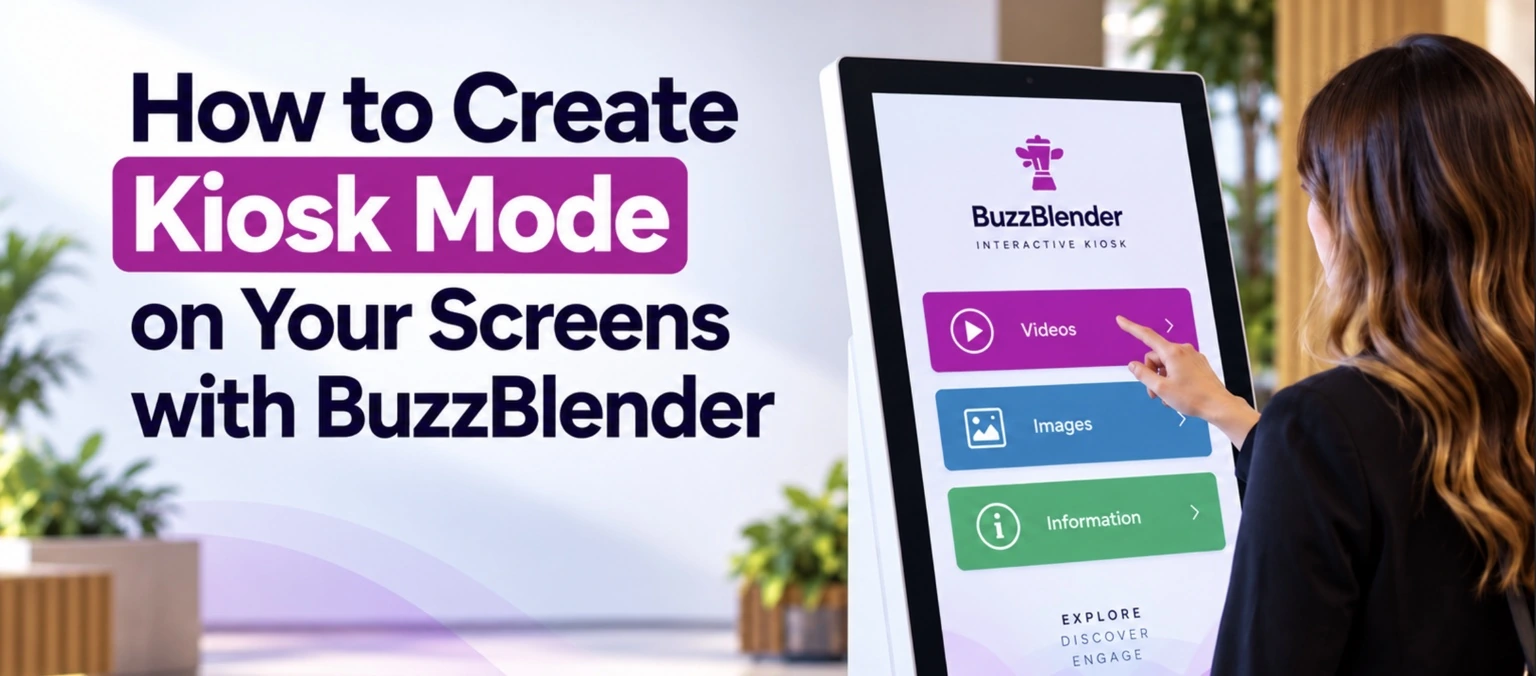
A digital signage screen does not have to be limited to playing a loop of images and videos. With an interactive interface, the same display can become a product catalog, information point, learning hub, visitor guide, showroom display or self-service kiosk.
BuzzBlender supports kiosk mode as part of its digital signage feature set. Its Basic plan also supports images, videos, web pages and HTML content, giving businesses several ways to build experiences that go beyond conventional playlist-based signage.
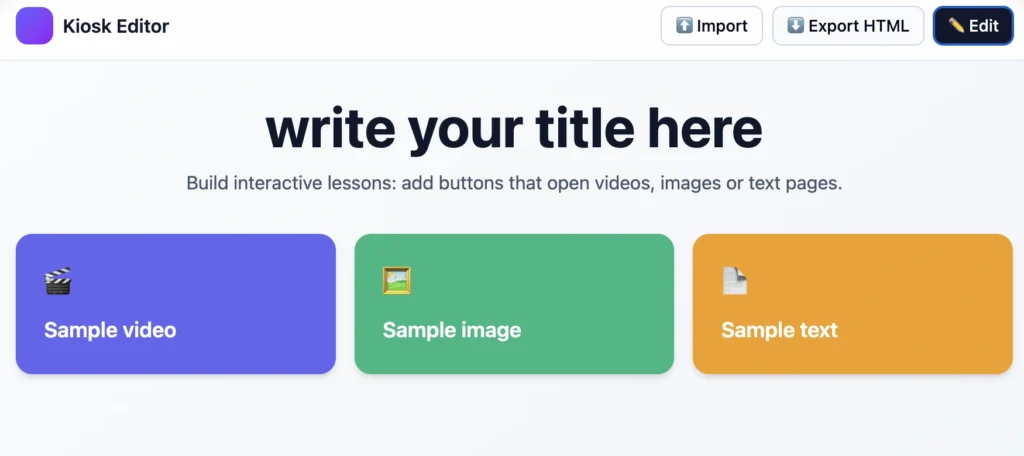
One simple way to build this type of experience is with the Kiosk Editor shown above. Instead of coding an interface from scratch, you can create buttons that lead visitors to different pieces of content, preview the experience and export it as HTML.
Here is how it works.
BuzzBlender is the best choice to get started. Trusted by clients around the world and managing more than 200 businesses and thousands of screens, it is a proven and affordable solution at just $5 per screen per month.
Use the promo code WELCOME100 to get your first month free. Create your account and connect your first screen.
Take control of your screens today with Buzzblender
What Is Kiosk Mode?
Kiosk mode turns a screen into a focused digital experience designed for a specific purpose.
Instead of giving visitors access to a normal operating-system desktop, browser interface or collection of unrelated applications, the screen presents the content and actions you want them to use.
On a touchscreen, for example, a visitor might see three large buttons:
Watch a Video
View Product Gallery
Learn More
Tapping one of those buttons can open the corresponding content and create a simple self-guided experience.
This is especially useful for interactive digital signage. BuzzBlender describes interactive signage as content that visitors can engage with directly through touchscreens, kiosks, tablets and other interactive displays.
Why Turn a Digital Signage Screen Into a Kiosk?
Traditional digital signage is primarily passive: the audience watches whatever content appears.
A kiosk introduces a second layer — choice.
Instead of waiting for the playlist to show information they need, visitors can select it themselves.
In a showroom, customers could choose between different product demonstrations. In a school or training center, students could open individual lessons. In a hotel, guests could access information about facilities or services. In an office reception area, visitors could browse instructions, maps or company information.
The result is one screen that can contain several different content paths without displaying everything simultaneously.
Meet the Editor
The Editor provides a straightforward way to build this structure.
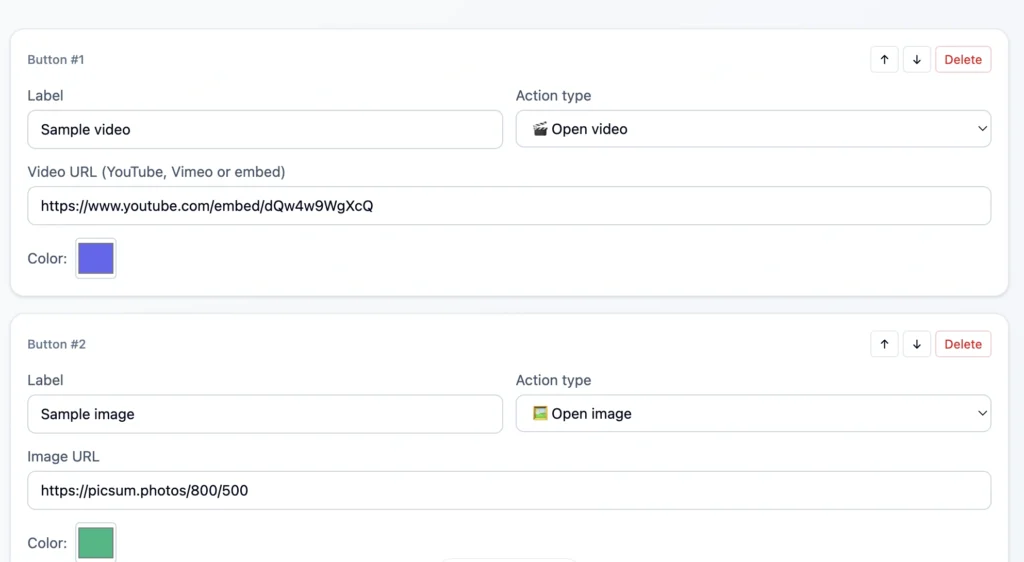
As shown in the editor, each interactive button has a Label and an Action type. Depending on the selected action, you can associate the button with content such as a video, image or text page.
For example:
| Button | Action | Possible kiosk use |
|---|---|---|
| Watch Video | Open video | Product demo or training video |
| View Gallery | Open image | Product image, map or instructions |
| Learn More | Open text page | Description, FAQ or visitor information |
You can also assign colors to individual buttons, change their order and remove buttons that are no longer needed.
Once the interface is ready, Preview lets you test the experience before publishing it, while Export HTML provides an HTML version that can be used as web-based signage content.
That last step is particularly useful because BuzzBlender supports HTML content in digital signage playlists.
Step-by-Step: How to Create Kiosk Mode
Step 1: Plan the Kiosk Navigation
Before adding buttons, decide what you actually want visitors to do.
A good kiosk home screen should be immediately understandable. Avoid presenting ten different actions when three or four will do.
For example, a training kiosk could start with:
Start Training → video
Safety Instructions → image
About This Course → text page
A retail kiosk could instead use:
Watch Product Demo → video
View Product → image
Product Information → text page
The underlying editor can remain the same while the experience changes according to the location.
Step 2: Create Your First Button
Start with the Label field.
This is the text your visitor will see, so use an action-oriented description rather than an internal file name.
For example, instead of:
Video 01
use:
Watch Product Demo
The second version tells the visitor exactly what will happen after tapping the button.
Next, choose the appropriate Action type.
Step 3: Add a Video
Choose Open video when the button should launch video content.
The editor shown in the example provides a field for a YouTube, Vimeo or embed URL.
Paste the appropriate video URL into the field and give the button a clear label.
A video action works particularly well for tutorials, product demonstrations, onboarding, training material and explanatory content.
Instead of forcing every visitor to watch the video as part of a traditional signage playlist, the kiosk makes the content available on demand.
Step 4: Add an Image
For visual information, select Open image and provide the image URL.
This can be useful for displaying floor plans, diagrams, product photography, instructions, schedules, restaurant information or other visual resources.
For touchscreen deployments, make sure important details are large enough to read at the expected viewing distance.
Step 5: Add Information Pages
Not everything belongs in a video or JPG.
Text pages can provide additional explanations, instructions or other information without overcrowding the kiosk home screen.
This creates a simple hierarchy:
Home screen → Button → Detailed information
It is often much easier to navigate than placing a large amount of copy directly on the opening screen.
Step 6: Use Colors to Organize the Experience
The editor lets you assign a color to each button.
Color can do more than improve the appearance of your kiosk. It can help visitors understand its structure.
For example, video lessons could share one color while documentation uses another.
Keep the palette relatively simple, however. Too many unrelated colors can make a kiosk look more complicated rather than easier to navigate.
Step 7: Arrange Your Buttons
The up and down controls let you change the order of your actions.
Put the most important action first.
If 80% of visitors are expected to watch a demonstration, Watch Demo should not be hidden at the bottom of the interface.
Navigation should reflect visitor priorities rather than the order in which the content happened to be created.
Step 8: Preview the Kiosk
Before deploying the project, click Preview.
Test every button.

Check whether the correct video opens, images load correctly and text pages are easy to read. If the finished experience will run on a touchscreen, test it as a touchscreen experience rather than only with a mouse.
Pay particular attention to button size and spacing. An interface that looks good on a laptop can still be frustrating when someone is standing in front of a large touch display.
Step 9: Export the Experience as HTML
Once the project is ready, use Export HTML.
HTML is particularly useful for digital signage because it can combine layout, navigation and web-based behavior in a format suitable for interactive experiences.
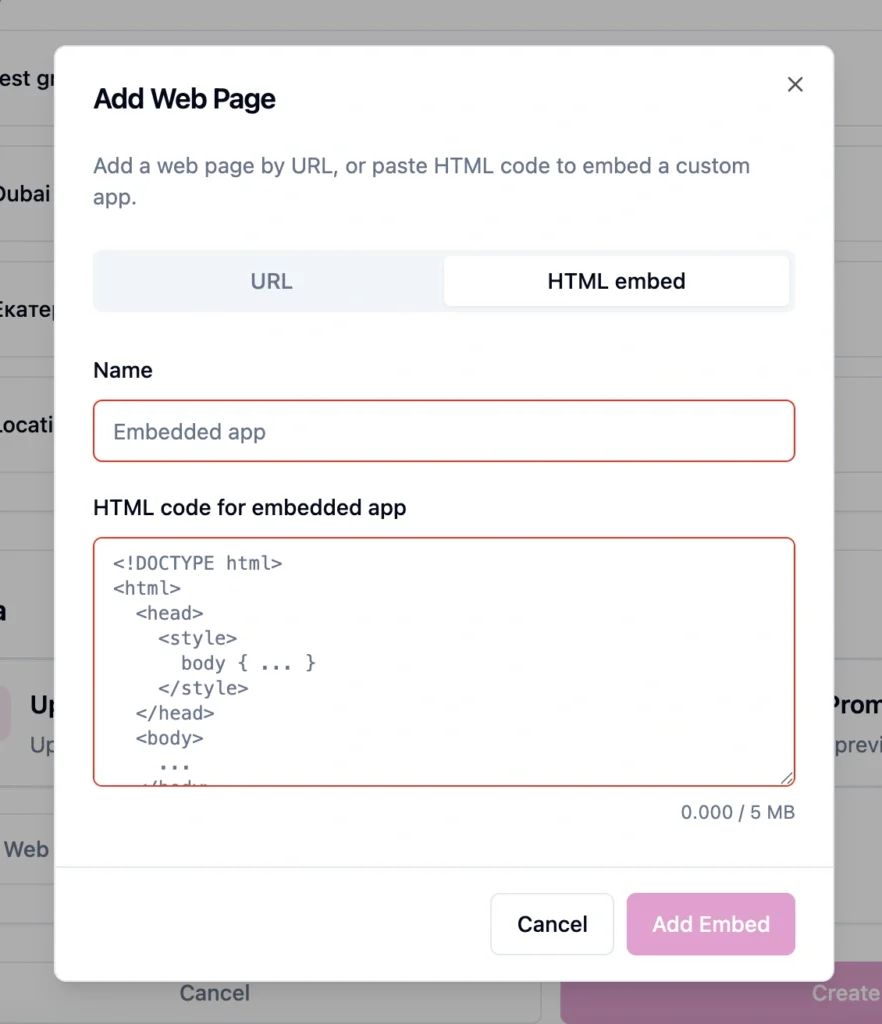
BuzzBlender supports custom HTML as digital signage content.
Step 10: Publish the Kiosk to Your Screen
The general BuzzBlender workflow consists of connecting a device, adding content and publishing it to screens. Content can then be managed remotely through the cloud dashboard.
For your kiosk project, the exported interactive HTML becomes the experience you deploy instead of relying exclusively on a conventional image/video playlist.
BuzzBlender currently lists Kiosk mode and the ability to upload Web Page and HTML content among the features of its Basic plan.
This means the same digital signage environment can be used both for conventional content playback and more interactive kiosk-style deployments.
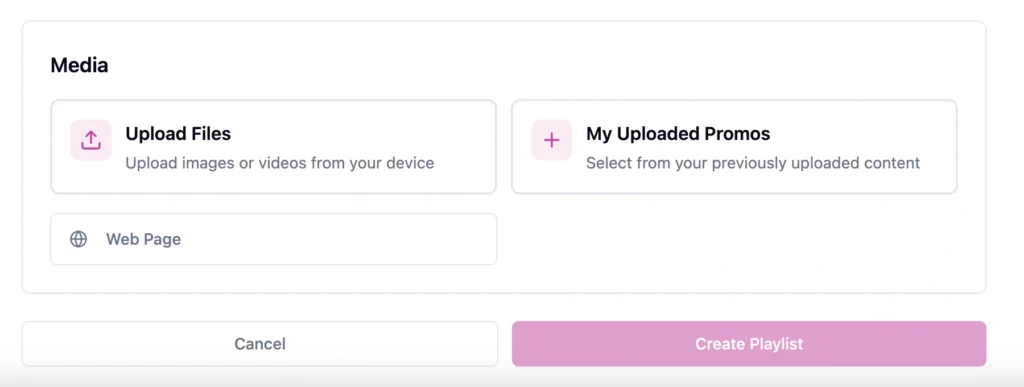
Create a playlist, then click Webpage to add your HTML content.
Where Can You Use This Type of Kiosk?
The same Learning Hub structure can be adapted to many industries.
A retail store can create an interactive product catalog where shoppers choose a product, watch a demonstration and open more information.
A showroom can let visitors explore different models or services without requiring an employee to start every presentation.
A school or training center can create self-guided lessons where users choose a topic and open the relevant video or learning material.
A hotel can build a digital information point containing property information, facilities and guest instructions.
A corporate office can place an interactive information screen in a reception or common area.
Interactive digital signage is particularly suited to these scenarios because the visitor controls what information appears instead of waiting for a predetermined playlist.
Kiosk Mode vs. Regular Digital Signage
| Regular digital signage | Kiosk mode |
|---|---|
| Content plays automatically | User chooses content |
| Mostly passive | Interactive |
| Ideal for promotions and announcements | Ideal for exploration and self-service |
| Playlist-driven | Navigation-driven |
| No user input required | Designed around user actions |
| Best for broadcasting information | Best for finding specific information |
hese approaches do not have to compete with one another.
A business might use ordinary digital signage on menu boards and promotional displays while deploying kiosk experiences only on touch-enabled screens where interaction adds value.
Best Practices for Building a Better Kiosk
Keep the home screen simple. Every additional button increases the number of choices a visitor must understand.
Use short labels such as Watch Demo, View Map or Learn More rather than sentences.
Design for touch when the screen is interactive. Buttons should be easy to tap, and important controls should not sit too close together.
Optimize media before deployment. Large images and unnecessarily heavy video or web assets can make an interactive experience feel slower.
Most importantly, test the entire journey on the actual hardware. A kiosk should be evaluated from the visitor’s perspective: standing in front of the display and using it without prior instructions.
Pros and Cons of Building a Kiosk This Way
| Pros | Cons |
|---|---|
| No need to design navigation from scratch | Interactive experiences require careful UX planning |
| Supports different content types | External content depends on the availability of its source |
| Easy button-based navigation | Touch interaction requires suitable hardware |
| Preview before deployment | More complex projects may require custom HTML development |
| HTML export | Content should be tested on the target screen |
| Can be integrated into a broader digital signage workflow | Poorly organized kiosks can overwhelm visitors |
BuzzBlender for Kiosk and Digital Signage Deployment
BuzzBlender is a cloud-based digital signage platform for managing content across screens from a centralized dashboard. The platform supports multiple display environments and allows businesses to publish and update screen content remotely.
At the time of writing, the official pricing page lists the Basic plan at $5 per screen per month. It includes kiosk mode, content playlists and scheduling, remote management, screen monitoring, QR-code overlays, portrait and landscape orientations, images, videos, web pages and HTML, among other listed capabilities.
Key Takeaways
The Learning Hub Editor provides a simple way to turn a collection of videos, images and information into an interactive, button-driven experience. Create the navigation, assign an action to each button, organize the interface, test everything with Preview and export the finished project as HTML.
FAQ
What is kiosk mode in digital signage?
Kiosk mode is a screen configuration designed to provide a focused experience rather than expose the normal device interface. In interactive deployments, visitors can use buttons or touchscreen controls to navigate selected content.
Can I create an interactive kiosk without coding?
The Learning Hub Editor shown here lets you assemble a basic interactive experience using configurable buttons for content such as videos, images and text pages. More sophisticated workflows may still require custom HTML or application development.
Can I show videos in the kiosk?
Yes. The editor includes an Open video action and a field for video URLs, including YouTube, Vimeo or embed content.
Can I use images?
Yes. Select Open image, provide the image URL and assign a label to the button.
Can I export my kiosk as HTML?
Yes. The interface includes an Export HTML function. BuzzBlender also officially supports HTML as a digital signage content type.
Does BuzzBlender support kiosk mode?
Yes. Kiosk mode is currently listed on BuzzBlender’s official pricing page among the features included with the Basic plan.
How much does BuzzBlender cost?
The Basic plan is currently listed at $5 per screen per month, while Premium is $10 per screen per month. An Enterprise option is available for larger deployments.
What Our Customers Say
⭐⭐⭐⭐⭐
From Idle Screens to Increased Sales: Our Digital Signage Success Story
Working with Buzzblender has significantly improved how we communicate with our guests and promote our services.
The team was extremely responsive and supportive throughout the entire process — from onboarding to daily operations. Everything was set up quickly, and we were able to start using digital signage across our hotel almost immediately.
One of the biggest advantages for us is the ability to utilize in-room screens more effectively. When guests are not actively watching TV or streaming platforms like Netflix, we now display targeted promotional content — including room service offers, restaurant specials, beverages, and spa experiences.
This approach has had a direct impact on our revenue. We’ve seen a noticeable increase in spa bookings, as well as higher engagement with our restaurant and in-room dining services.
Catalina, Marketing Director




Leave a Reply