
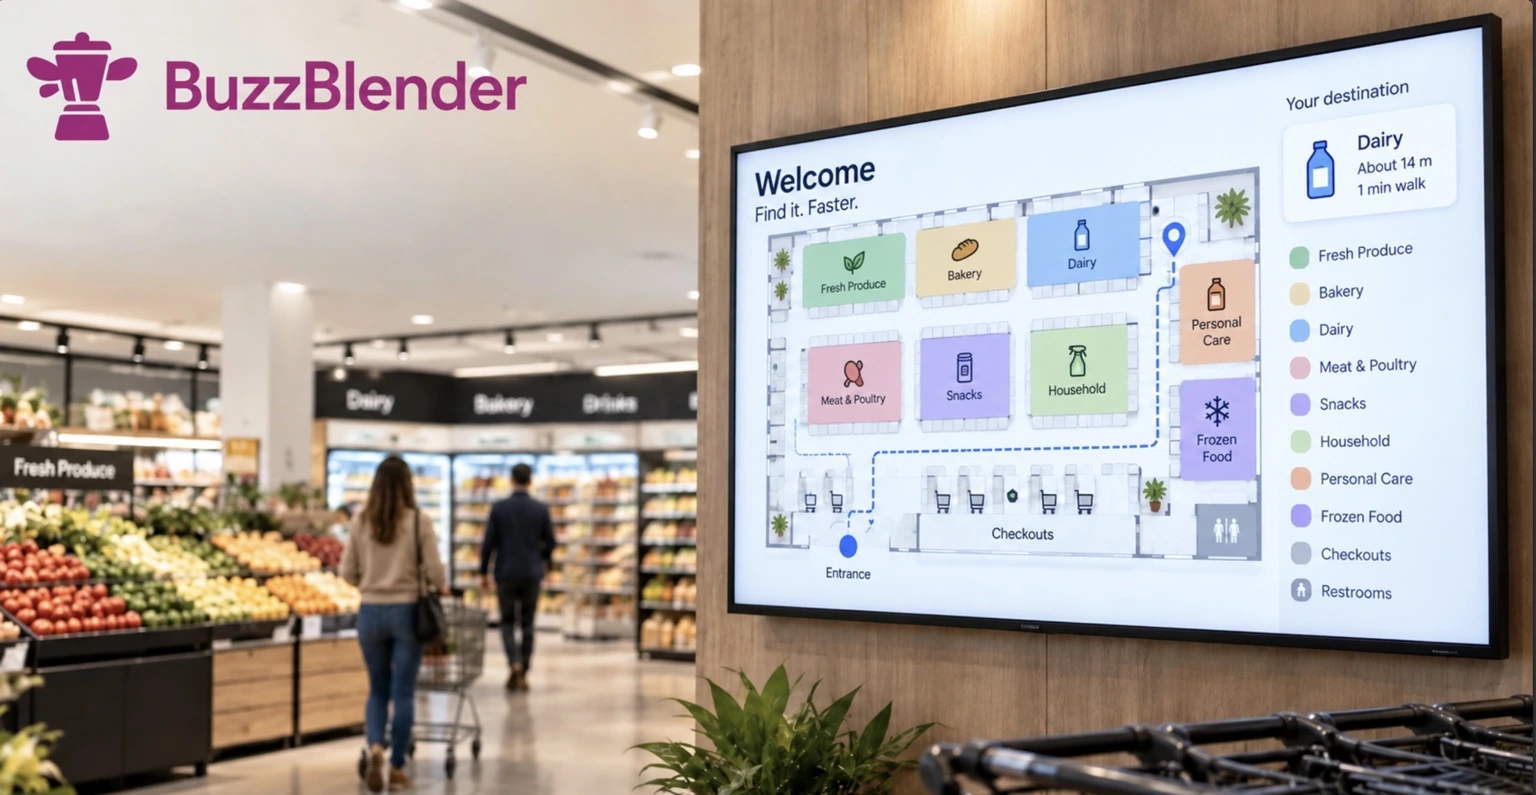
“Where can I find this product?”
It is one of the most common questions in a supermarket, department store or other large retail environment. Even when aisle signs are clearly visible, customers may still need help finding a specific department, product category, checkout, fitting room or service desk.
A digital store map provides another way to answer that question.
With Store Map Editor, retailers can recreate their sales floor, add departments and fixtures, name aisles and destinations, and create walking routes around shelves and walls. The finished map can then be switched into a screen-friendly mode and published for use on in-store displays.
Combined with BuzzBlender, that map can become part of a centrally managed retail digital signage network.
Here’s how to quickly display your store wayfinding map on your screens:
- In the map editor, click “Share Map”, then select “Copy HTML code.”
- In BuzzBlender, open your playlist and go to Media → Web Page → HTML Embed.
- Give your map a name, paste the code into the “HTML code for embedded app” field, and click “Add Embed.”
- Whenever you make changes to your store map, simply click “Update the link.” Your screens will refresh automatically, so there’s no need to copy and paste the embed code again.
Use this link to create an interactive store map.
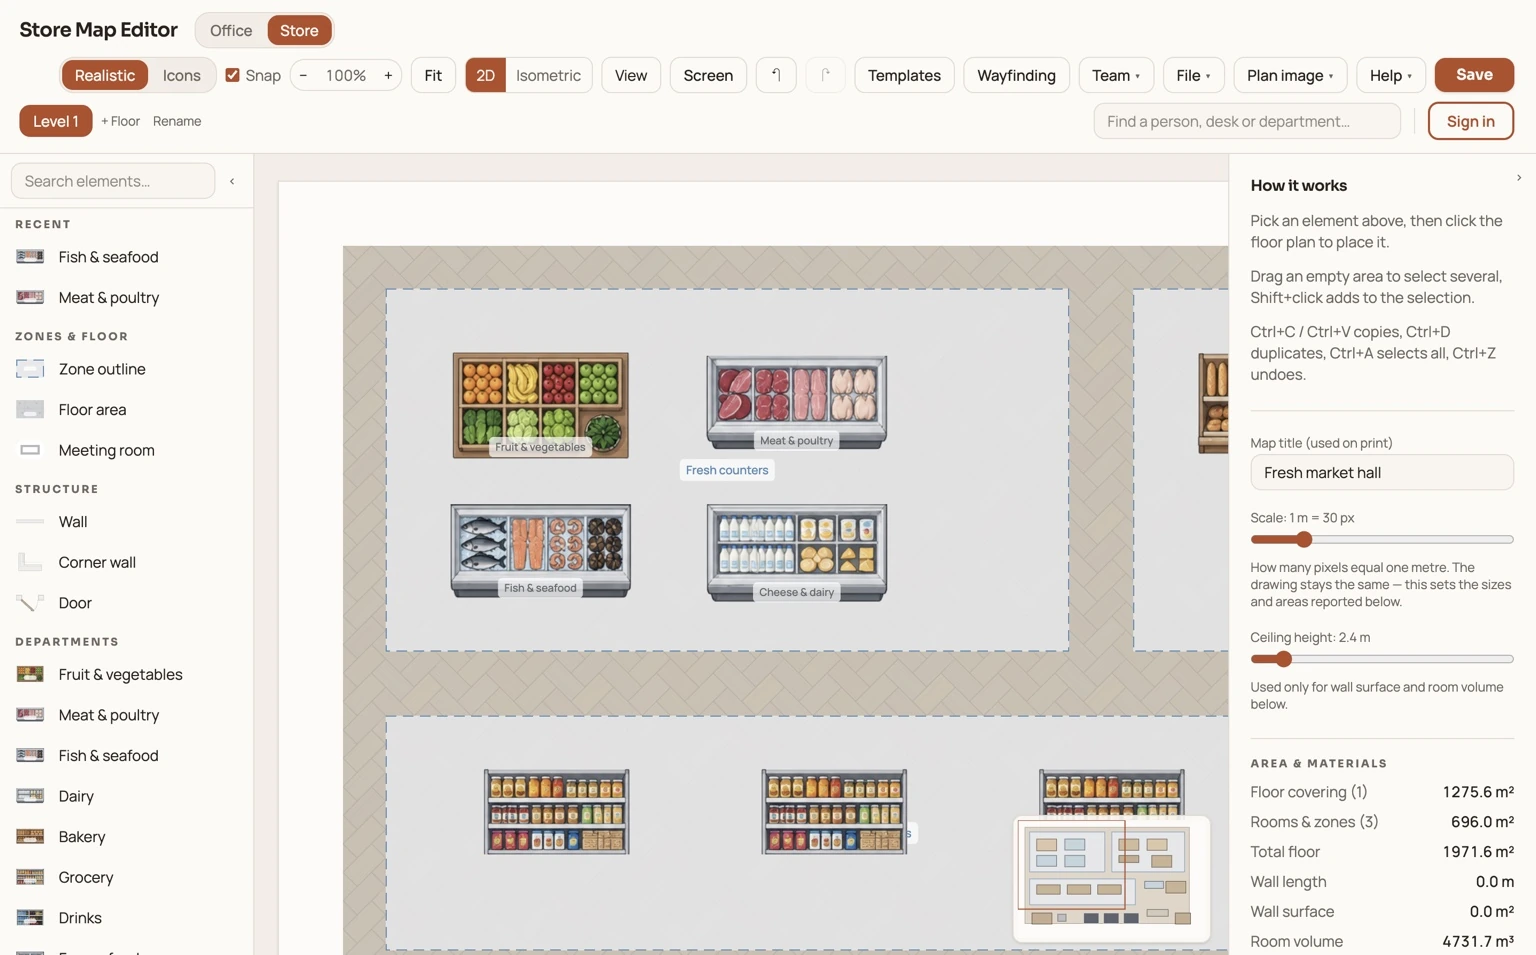
What Is Store Map Editor?
Store Map Editor is designed for building visual retail floor plans.
When you switch the editor from Office to Store, its palette changes to retail-specific elements, including shelves, fridges, freezers, checkouts, fitting rooms, entrances and category markers.
This makes it possible to represent the actual structure of a store rather than using a generic floor-plan image.
A supermarket, for example, can contain Produce, Dairy, Bakery and Frozen Food departments together with individual aisles, checkout areas, service points and entrances.
Once those elements have names and properties, they can also become destinations for customer wayfinding.
Step 1: Switch to Store Mode
Start by selecting the Office / Store toggle in the top-left corner and choosing Store.
The element palette changes automatically to retail objects.
Before drawing the store, set the correct Scale in the properties panel.
This step is particularly important for wayfinding. Route distance, estimated walking time and area calculations all depend on the scale of the plan.
In other words, if you want the map to tell a customer that Dairy is approximately 14 metres away, the digital floor plan needs to correspond to the dimensions of the real store.
Step 2: Start with a Retail Template
You don’t necessarily need to build the entire store from an empty canvas.
Open Templates to access ready-made retail layouts.
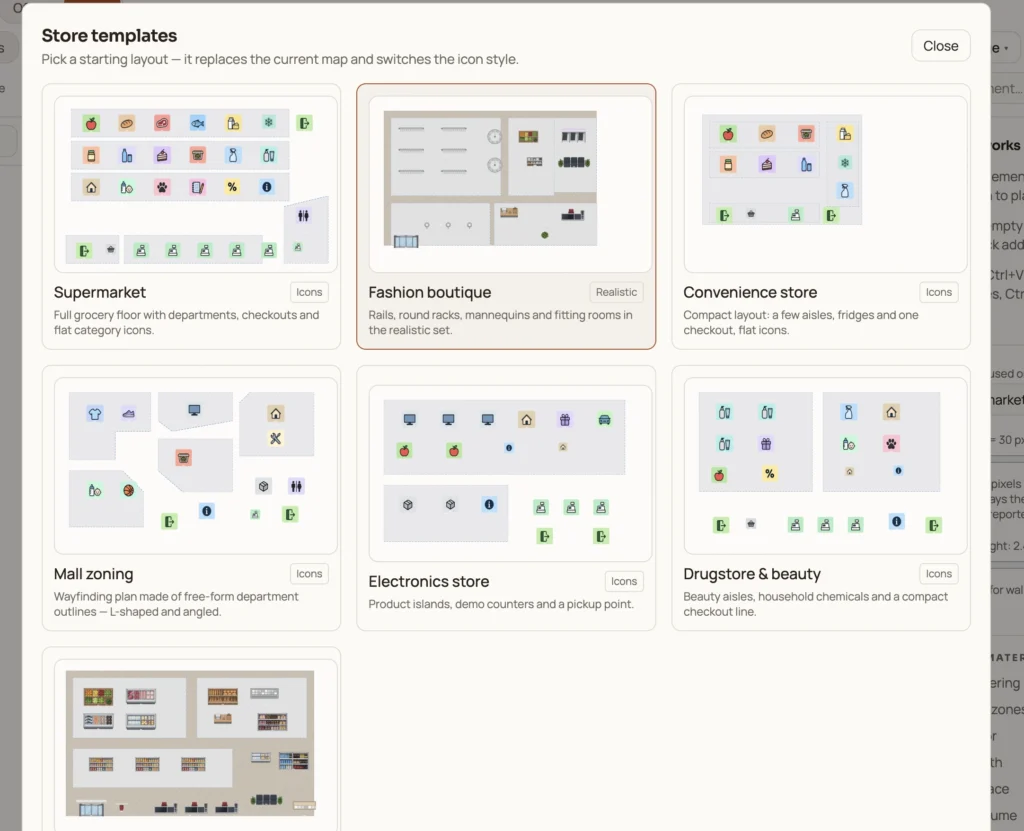
We have templates for several store types:
| Store type | Example use |
|---|---|
| Supermarket | Grocery and food retail |
| Fashion boutique | Clothing and accessories |
| Convenience store | Small-format retail |
| Mall zoning | Shopping centres |
| Electronics | Consumer electronics stores |
| Drugstore | Pharmacy and beauty retail |
| Fresh market hall | Fresh food and market concepts |
Selecting a template replaces the current map and switches to the icon style for which that template was designed.
This can be the quickest way to understand how a finished retail map should be structured before adapting it to your own location.
Step 3: Import an Existing Store Plan
If you already have a store plan from an architect, landlord or previous refit, use that instead.
Select:
Plan image → Upload plan
You can place a photo or PDF export of the existing plan behind the editor canvas and adjust its opacity.
Store Map Editor also provides Auto-trace, which detects walls and closed rooms from the imported drawing.
A practical workflow is therefore:
Upload existing floor plan → set the scale → trace the store → add retail fixtures → create departments → add wayfinding.
This can be considerably faster than trying to recreate an existing store purely from memory.
Step 4: Draw the Store Walls and Entrances
Once the basic floor plan is ready, create the shell of the store.
Choose Wall and drag to draw the perimeter and internal walls. The wall tool remains active while you work, connected walls are glued together, and corners are mitred automatically.
Press Escape when you have finished drawing.
Next, add the actual entrance and exit points.
Their positions matter because an entrance can later be used as the starting point for customer routes.
For example:
From: Entrance
To: Dairy
or:
From: Entrance
To: Fitting Rooms
The closer the digital plan matches the physical store, the more useful its routes will be.
Step 5: Add Shelves, Fridges and Store Equipment
Now you can begin reconstructing the sales floor.
Select an element from the palette and click the map to place it. Corner handles can be used to resize fixtures, while Rotate 90° can turn a shelving run to create another aisle.
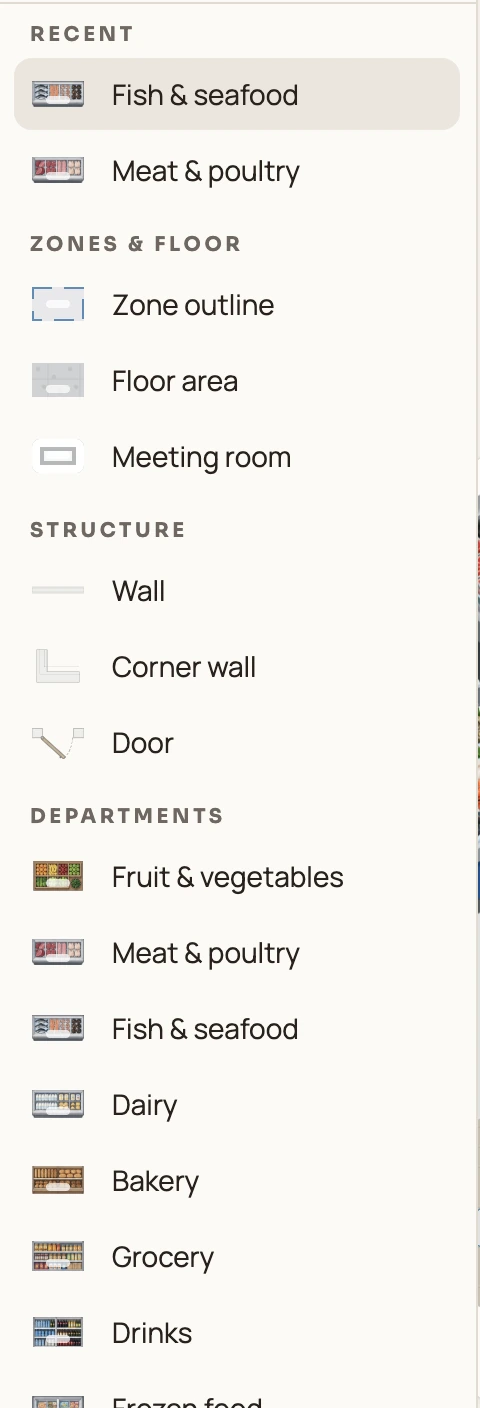
This is useful for representing long supermarket gondolas, refrigerated sections and other repeated fixtures.
The editor also helps with aisle spacing.
Select a row of objects and use Space evenly — Across or Down to create consistent spacing. While an object is being moved, the editor displays its distance from the nearest fixture in metres.
For retail teams, this gives the map another use beyond navigation: it can help visualize the arrangement of fixtures during planning.
Step 6: Add and Name the Checkouts
Checkouts shouldn’t simply appear as anonymous icons.
Store Map Editor includes elements for tills, self-service checkouts, service desks, pickup points and ATMs. We recommend placing these near the exit and assigning meaningful names such as Checkout 1 and Checkout 2.
Naming is important because named elements can become wayfinding destinations.
Instead of merely showing where the checkout area is located, your map can potentially route a customer toward a particular destination.
Step 7: Create Departments and Color-Coded Zones
Now add the major areas customers actually recognize.
Select Zone outline and click around the perimeter of a department. Click the first point again or press Enter to close the zone.
Each department can then be given a name and its own color.
For example:
Fresh Produce — green
Bakery — yellow
Dairy — blue
Meat & Poultry — red
Frozen Food — purple
These colors aren’t only for the editor. The same department colors appear in the legend when the map is displayed on a screen.
That gives customers a simple visual language for understanding the store.
Step 8: Name Aisles and Fixtures
The next step is what turns a visual floor plan into a searchable store map.
Give important fixtures descriptive names.
Instead of:
Shelf 14
you could use:
Aisle 4 — Pasta & Sauces
The editor also provides + Field for additional information.
We suggest fields such as category, planogram code, supplier, facings and responsible manager. Multiple fixtures can be selected together so that a field can be assigned to all of them at once or the fixtures can be numbered automatically.
This creates two levels of information.
Customers see a useful map of departments and destinations, while retail teams can maintain more detailed information about the fixtures behind it.
How to Create Wayfinding in Store Map Editor
This is where the map becomes much more than a digital floor plan.
The Store Map Editor includes a dedicated Wayfinding function for building customer routes.
Step 9: Open Wayfinding
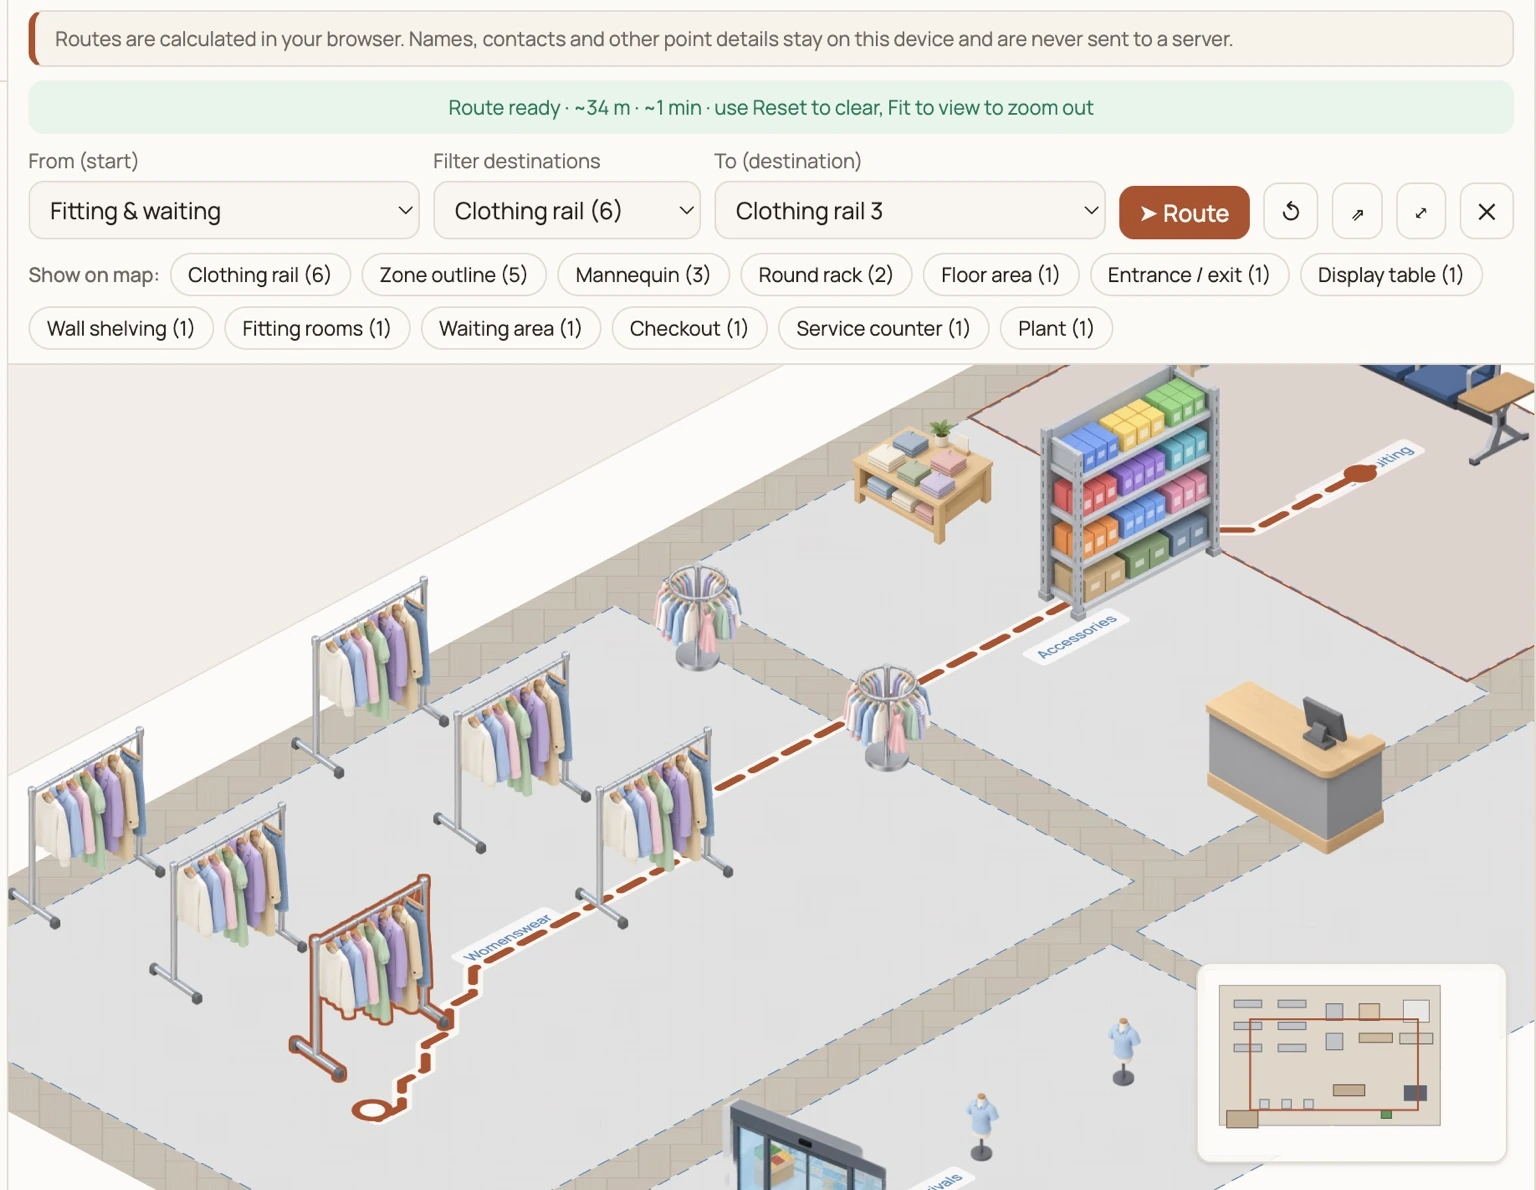
Click Wayfinding in the top toolbar.
A route interface appears above the store map.
You will see two main fields:
From — where the customer starts.
To — where the customer wants to go.
For a customer-facing map near the entrance, the starting point will usually be Entrance.
The destination could be a product, aisle or department.
For example:
From: Entrance
To: Dairy
That is why naming departments, aisles and fixtures properly during map creation is so important.
Step 10: Filter Destinations by Category
Large stores may contain hundreds of mapped elements.
The Category selector helps narrow the available suggestions to a particular type of destination.
For example, customers could search only for:
Checkouts
or:
Restrooms
or another relevant element category.
This prevents the wayfinding interface from becoming unnecessarily cluttered.
Step 11: Calculate the Route
Once From and To have been selected, press ➤ Route.
Store Map Editor draws a dashed walking path through the store.
Importantly, the route isn’t simply a straight line between two points.
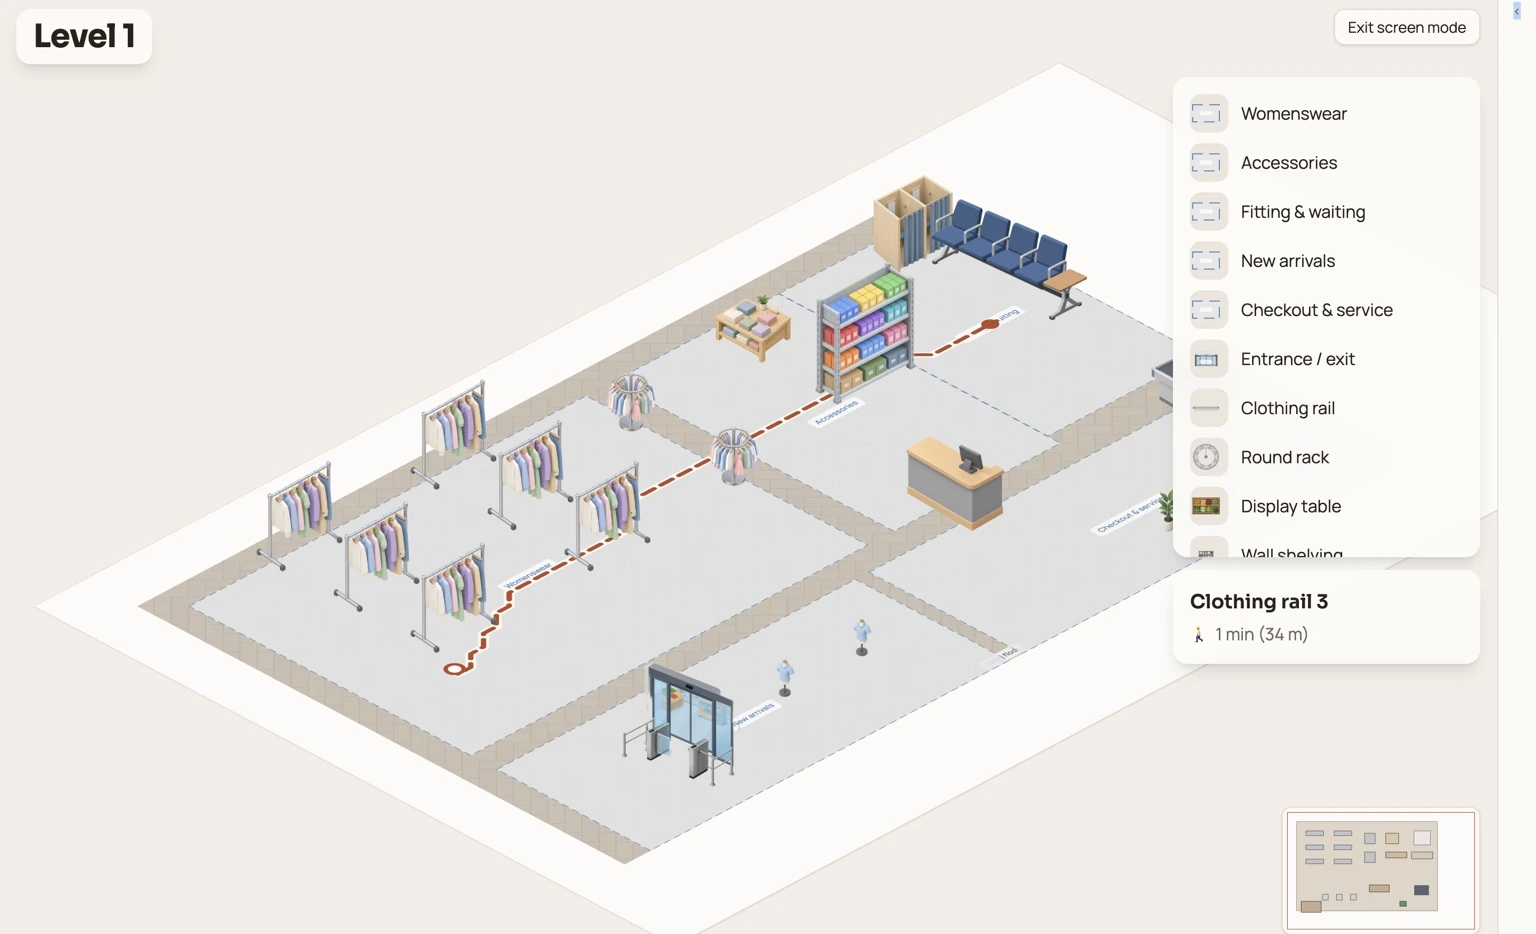
The map then displays both the distance in metres and estimated walking time.
Step 12: Clear, Resize or Share the Route
The wayfinding toolbar provides several additional controls.
↺ clears the current route.
Fit to view adjusts the floor so that it fits the available screen area.
⇗ copies a link that opens the map with that specific route already created.
That last function creates an interesting retail use case.
A store could place a QR code on a shelf talker or other printed material. The QR code could lead to a predefined route on the digital map.
For example, a promotional sign could direct a shopper to another department where a related product is located.
Step 13: Show All Locations of One Type
Not every customer needs a complete route.
Sometimes the question is simply:
“Where is the nearest restroom?”
or:
“Where are the fitting rooms?”
For that scenario, use Show on map.
The feature can pin every mapped item of the selected type simultaneously — for example, all checkouts, all restrooms or all fitting rooms.
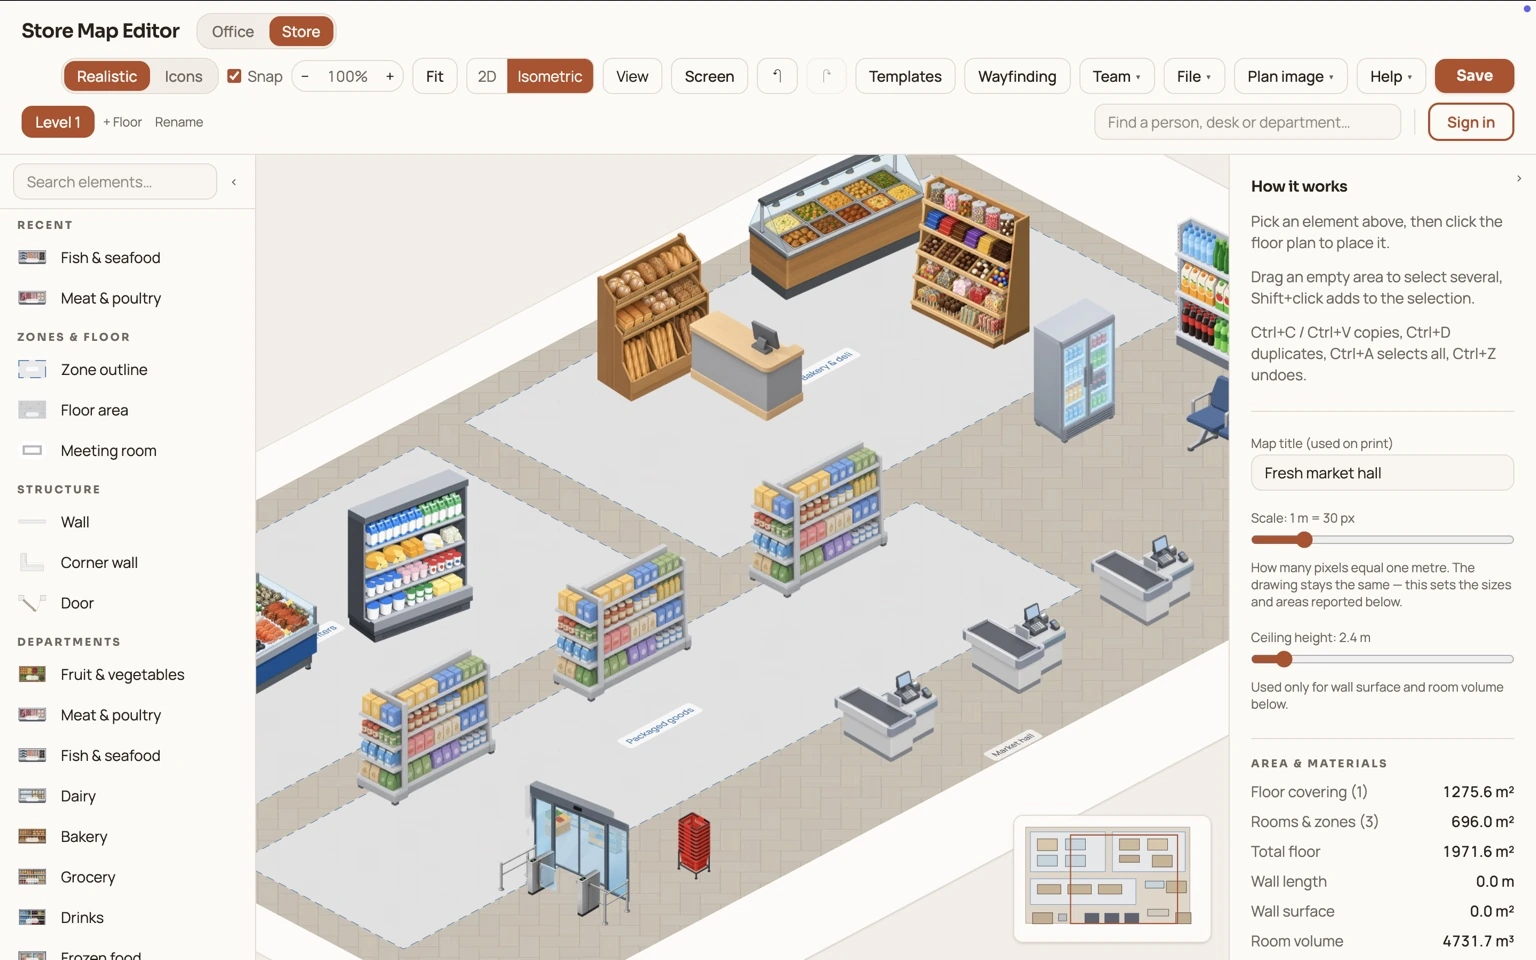
Customers can then identify the nearest location visually without calculating a route.
How to Display the Store Map on an In-Store Screen
After building the store map and wayfinding, the next step is getting it out of the editor and onto a customer-facing display.
Store Map Editor includes a dedicated Screen mode for this purpose.
Step 14: Prepare the Map for a Large Display
First, create the route that you want customers to see.
Then switch the visual style to Icons.
This matters because a map that looks clear on a laptop isn’t necessarily readable on a screen several metres away.
Keep labels simple and make department colors easy to distinguish.
Step 15: Activate Screen Mode
Click Screen in the top toolbar.
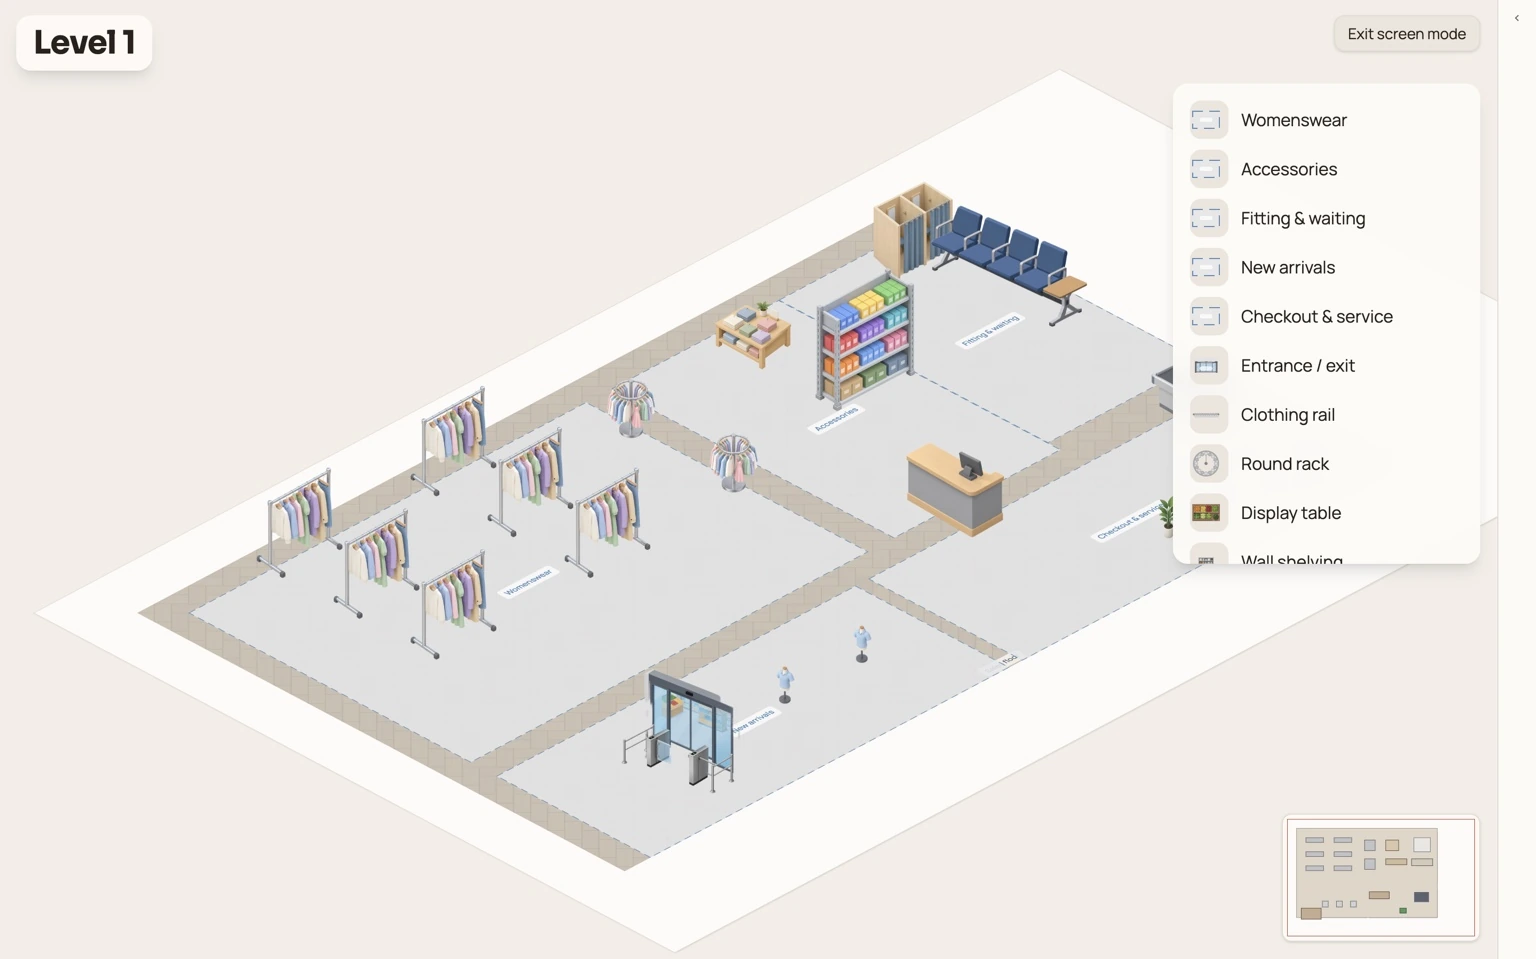
The editing interface disappears and the map becomes a full-screen signage board.
The Screen Mode displays the floor name prominently on the left, a legend of departments and element types on the right, and a destination card containing walking time.
Press Escape or Exit screen mode when you want to return to editing.
Step 16: Publish the Store Map
For a map that needs to stay live rather than being exported as a static image, use the following publishing workflow:
Share map → Copy HTM:
Publishing uploads the map to the cloud and generates a link.
That URL/HTML can then be used as the content source for your digital signage.
Quickly, here’s how to show it on the screens:
- In the map editor, click “Share Map”, then “Copy HTML code.”
- In BuzzBlender, open a playlist, then go to Media → Web Page → “HTML embed.”
- Give it a name, paste the code into the “HTML code for embedded app” box, and click “Add Embed.”
- After you make changes to the plan, click “Update the link.” The screens will refresh automatically, so you won’t need to paste the code again.
How to Display the Store Map with BuzzBlender
This is where Store Map Editor and BuzzBlender connect.
BuzzBlender’s current platform supports web pages and HTML as digital signage content alongside images and videos. Its Basic plan also currently includes kiosk mode.
The overall workflow becomes:
Store Map Editor → Publish Map → Copy Link → BuzzBlender → Web Page → Playlist → Retail Screen
Step 17: Add the Map to a BuzzBlender Playlist
Publish your map and copy its public URL or HTML.
In BuzzBlender, create or open the playlist used by the relevant retail screen and add the store map as web content.
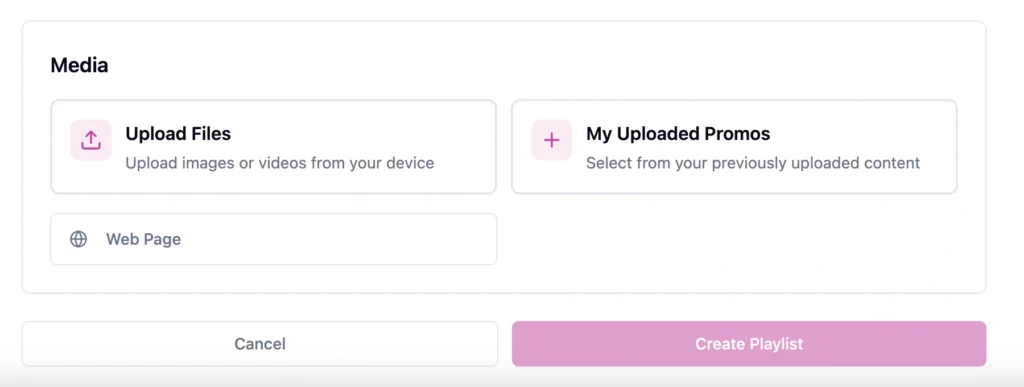
BuzzBlender’s standard digital signage workflow is to connect the device, add content and publish that content to the required screens. Displays and content can then be managed remotely from the cloud dashboard.
This means the map can sit alongside your other retail content rather than requiring a separate signage system.
For example, the same screen strategy could incorporate the store directory, promotions, campaign content and other customer-facing information.
Step 18: Keep the Store Map Updated
One major advantage of publishing the live map instead of repeatedly exporting screenshots is easier updating.
Once the published map is being shown through BuzzBlender, later Save to cloud updates are reflected on the displayed live plan.
Imagine that Dairy moves during a store refit.
Instead of recreating a digital signage graphic from scratch, the retail team can modify the store map, save the change and keep the published map current.
This can be especially useful for stores that regularly reorganize departments or seasonal areas.
Turn a Touchscreen into an Interactive Store Directory
A regular display can show a predefined store map or route.
A touchscreen opens another possibility.
The link can be opened full screen on a touch kiosk, allowing visitors to search and create routes themselves.
BuzzBlender has a Kiosk mode as part of its Basic plan.
This creates a self-service customer experience.
A shopper approaches the kiosk, searches for a destination and views the resulting route through the store.
For example:
Entrance → Fresh Produce
Entrance → Dairy
Entrance → Restrooms
Entrance → Checkout
Entrance → Fitting Rooms
For larger supermarkets, malls and department stores, this turns digital signage from passive content into a navigation tool.
Static Screen vs. Interactive Wayfinding Kiosk
| Feature | Digital signage screen | Touch kiosk |
|---|---|---|
| Show store map | Yes | Yes |
| Show predefined route | Yes | Yes |
| Department legend | Yes | Yes |
| Walking distance/time | Yes | Yes |
| Customer searches destination | No interaction required | Designed for self-service interaction |
| Customer creates own route | Not required | Yes, according to Store Map workflow |
| Best use | Entrance information, directories | Large stores and self-service navigation |
The right choice depends on where the display is installed and what customers need to do with it.
A screen above or near an entrance may simply need to display the store map and major departments.
A touchscreen at the entrance can provide more direct customer interaction.
What Else Can You Do with Store Map Editor?
Wayfinding is only one part of the editor.
View the Store in 3D
Switch to Isometric to see the sales floor in 3D.
Individual elements can have their own height and elevation. We position this as a quick way to present a store refit to management.
For example, before changing the layout of a supermarket, a retail team could build the proposed configuration and use the isometric view to communicate how the new fixture arrangement will look.
Add Floors or Stockrooms
Use + Floor to create another level or stockroom.
Work is saved per floor in the browser as you edit.
That makes the editor applicable to stores that aren’t limited to one simple sales floor.
Save Versions Before Seasonal Changes
Retail layouts change frequently.
A Christmas configuration may be very different from the store layout used in spring.
The Save version function creates a named cloud snapshot before a reset or seasonal change.
That provides a way to preserve previous configurations instead of rebuilding them later.
Export the Store Data
Store Map Editor can also export the map in several formats.
Available exports include a CSV list of fixtures, single-file HTML page, PNG image and printable sheet. The complete project can also be downloaded using Save to file.
That means the same store plan can serve different purposes: signage, internal documentation, presentations or fixture data.
Store Map Functions at a Glance
| Function | What it does | Retail use |
|---|---|---|
| Store Mode | Loads retail-specific elements | Build a retail floor plan |
| Templates | Opens ready store layouts | Start a map faster |
| Upload Plan | Adds existing PDF/image | Recreate an existing store |
| Auto-trace | Detects walls and rooms | Speed up floor-plan creation |
| Zone Outline | Creates colored departments | Produce, Dairy, Bakery, etc. |
| + Field | Adds custom fixture data | Category, supplier, planogram |
| Space Evenly | Aligns selected fixtures | Create consistent aisles |
| Wayfinding | Calculates walking routes | Customer navigation |
| Show on Map | Shows all items of a type | Find restrooms/checkouts |
| Screen | Creates signage-friendly view | Display map in store |
| Publish Map | Creates cloud URL | Connect map to signage |
| Isometric | Displays store in 3D | Visualize a refit |
| Export | Outputs map/data | PNG, HTML, CSV, print |
Pros and Considerations
| Advantages | Considerations |
|---|---|
| Build a store-specific floor plan | Initial map must accurately represent the store |
| Map departments, aisles and equipment | Scale needs to be configured correctly |
| Create customer walking routes | Store changes need to be reflected on the map |
| Show distance and walking time | Screen readability should be tested in the real environment |
| Create links to predefined routes | Interactive use requires suitable hardware/setup |
| Display a live map through BuzzBlender | Network access may be relevant for live web content |
| Use a touchscreen for self-service navigation | Touch UI should be tested before deployment |
| Manage signage remotely | Physical screen positioning still matters |
Where Should You Install Store Wayfinding Screens?
Placement should follow the customer’s actual journey.
The entrance is an obvious location because customers can find a department before beginning their shopping trip.
Screens can also be useful near escalators and elevators in multi-level stores, around major intersections in large retail spaces, and close to customer-service areas.
A touchscreen directory works best where shoppers can comfortably stop and interact without blocking traffic.
The goal isn’t simply to add more screens. It is to place navigation at points where customers need to make a decision about where to go next.
Store Map + BuzzBlender: Complete Workflow
The complete setup can be summarized as:
1. Switch Store Map Editor to Store Mode.
2. Select a retail template or upload your existing floor plan.
3. Set the correct scale.
4. Draw walls, entrances and exits.
5. Add shelves, fridges, fitting rooms, checkouts and other fixtures.
6. Create and color-code departments.
7. Name aisles, fixtures and destinations.
8. Open Wayfinding.
9. Select From and To.
10. Generate and test the customer route.
11. Switch to Icons for better distance readability.
12. Open Screen Mode and check the customer-facing layout.
13. Select Share map.
15. Add the map URL or HTNL to a BuzzBlender playlist as web content.
16. Publish the playlist to your in-store display.
17. For an interactive touchscreen, open the published map in a suitable kiosk deployment.
How to Display Your Store Map on a Screen with BuzzBlender
Once your store map and wayfinding routes are ready, you can turn the map into customer-facing digital signage. This allows shoppers to see departments, aisles, checkouts and directions directly on a TV, commercial display or touchscreen inside the store.
The setup consists of two parts: first, prepare and publish the map in Store Map Editor; then add the published map to your BuzzBlender screen.
Key Takeaways
Store Map Editor provides retail-specific tools for creating sales-floor maps rather than generic floor plans. Retailers can map shelves, departments, checkouts, entrances and other fixtures and add custom information to them.
Its Wayfinding feature lets you choose a starting point and destination and calculate a walking route around walls and shelving, including distance and estimated walking time. Routes can also be shared through dedicated links.
For digital signage, the editor has a dedicated Screen Mode and a cloud publishing workflow.
BuzzBlender can then provide the digital signage layer for publishing and remotely managing that content on compatible screens.
Take control of your screens today with Buzzblender
FAQ
Can I use an existing supermarket floor plan?
Yes. Store Map Editor can place an existing image or PDF plan behind the canvas. You can adjust its opacity and use Auto-trace to detect suitable walls and closed rooms.
Can I create different departments?
Yes. Use Zone Outline to create a department boundary, then give it a name and color. Those colors also appear in the screen legend.
Can customers search for a product or department?
The Wayfinding interface’s From and To fields autocomplete from names and field values stored on the map.
Does wayfinding avoid shelves and walls?
Yes. Route draws the walking path around shelves and walls and provides distance and walking time.
Can I create a route from the entrance to a department?
Yes. A typical configuration is to use the entrance as From and the required department or other mapped destination as To.
Can I display the store map on a TV?
Yes. Store Map Editor provides Screen Mode and a publishing workflow. The guide instructs users to publish the map, enable public link viewing and add the link to BuzzBlender as a web page playlist item.
Can I make an interactive store map on a touchscreen?
The Store Map Editor guide specifically describes opening the published map full screen on a touch kiosk so visitors can search and route themselves. BuzzBlender currently lists kiosk mode in its Basic plan.
How much does BuzzBlender cost?
BuzzBlender’s official pricing currently lists Basic at $5 per screen/month and Premium at $10 per screen/month. Enterprise pricing is available separately.
What Our Customers Say
⭐⭐⭐⭐⭐
Simple, Reliable, and Surprisingly Affordable Digital Signage
We tried several digital signage solutions before switching to BuzzBlender, and it has easily been the simplest and most reliable option we’ve used.
Setting it up on our Samsung displays was quick and straightforward. Managing content is just as easy—even for team members who aren’t particularly tech-savvy. We can update our screens in real time, launch promotions, change menu content, and manage everything remotely without needing any additional hardware.
What really sets BuzzBlender apart is the combination of simplicity and affordability. It gives us everything we need without the complexity or high costs of other systems—and at just $5, the value is hard to beat.
Aadan


Leave a Reply